Advanced Guide: Sun Quest
Prerequisites
This quest is endgame content. It involves travelling long distances around the world through very hazardous areas, culminating in the creation of one of the most deadly objects in Noita. It is highly recommended, if not necessary, to have wands for fast travel, healing, and digging (ideally unlimited Extremely Dense Rock digging).
Having many protective perks will make this quest significantly safer, particularly the end part where you actually create the suns. You can accomplish this easily via "breaking the reroll machines". A total of 15 or more stacks of Stainless Armour (paired with Repelling Cape and Gas Blood to keep you free of stains) makes sundiving non-fatal.
You'll also need a Paha Silmä (one spawns guaranteed each run, but has a tendency to vanish) - can also be found in chests.
Introduction
High in the sky in The Work (Sky) and deep below the earth in The Work (Hell) are moons (the Moon and the Dark Moon, respectively). You can locate them using the Moon Radar perk.
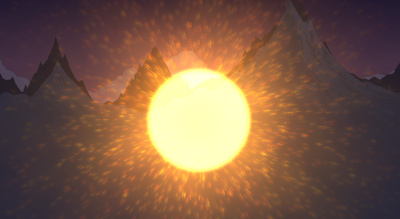
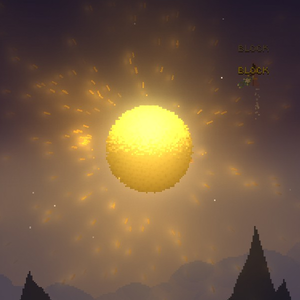
There are two types of suns - the "normal" Sun (which resembles a sun) and the Dark Sun (which resembles a black hole). Both are extremely dangerous to create, heavily damaging to be near, and almost certainly fatal to fall into.
Completing the Sun Quest, and receiving the reward, requires creating two suns, light and dark, at their respective moons. There are also several related achievements for which additional sun creation (and destruction) are necessary.
Sun damage
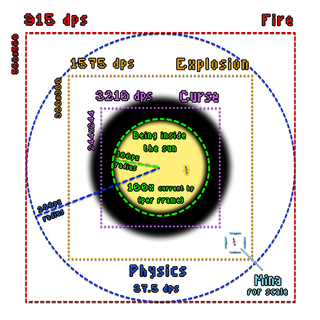
The Sun and Dark Sun are very dangerous - dealing huge damage to nearby entities. Four different damaging zones exist, centered on the sun:
- Fire - 915 damage per second - within a 560x560 area.
- Explosion - 1575 damage per second explosion damage - within a 380x380 area.
- Curse - 3210 damage per second - within a 244x244 area.
- Midas - (100x current hp per frame) - within a radius of 100.
The damage types are cumulative, being in the Curse damage area you'll also get the Explosion and Fire damage on top.
Note that the first 3 areas are square, and so approaching the sun vertically from above/below, or horizontally from left/right will allow you to get closer while suffering less damage. While the Dark Sun appears larger, it has identically sized damaging zones. This means you can get just inside it before suffering the extremely lethal Midas damage effect.
The Midas damage effect from being inside the Sun is similar to being hit with Touch of Smoke 60 times a second.
How to make a sun
Preparing
- Obtain a
 Paha Silmä (necessary for the boss fight step)
 - Obtain one each of the 4 elemental stones:[1]
- If making a dark sun, also obtain one:
- You'll need a series of powerful explosions to ignite the new sun. Obtain one of these options (and a wand set up to cast it in under a second).Any1of:orAny6of:
- Obtain a mechanism for spawning the 100 blood sacrifices needed to nourish the new sun. You can use Summon Egg, Summon Rock Spirit, Summon Taikasauva etc. to spawn entities for it to kill.[3] You can also create the sun somewhere with plenty of enemies nearby, e.g. Hiisi Base.
- Obtain a
 Sun Seed by defeating the Ghost miniboss (Unohdettu). The boss spawns in parallel worlds and can be farmed for multiple Sun Seeds.
 - Dropping the Sun Seed at the top of the pyramid will cause it to violently explode, and evolve into a
 Sun Stone. The explosion has a tendency to send the stone flying off the top of the pyramid, to become lost in the shifting sands of the desert. Filling the top of the pyramid with a liquid (one that wont evaporate - Blood is ideal) mitigates this.
Note that the Sun Stone inflicts proximity curse damage, but this stops if you pick it up into your inventory. - Decide where you want the sun to be (it is far easier to move the Sun Stone at this stage than any later stage). Finish preparing by bringing together the necessary elemental stones, blood sacrifice, and explosives. Clear the immediate area of enemies (unless you plan on using them for the sacrifice). If you are creating the sun within the moon, dig a tunnel into the top of the moon down about 1/2 of the way to the centre.
Ignition
This comprises three stages:
- Set off the explosion(s) to transform the
 Sun Stone into a
  Sun Egg.
- The explosions need to happen within a radius of ~130px.
- If multiple explosions are required, they must happen within the space of 1 second.
- Spells that can accomplish this task with multiple explosions: Bomb, Holy Bomb, Giga Holy Bomb, Meteor, Nuke, Dormant Crystal, Thunder Charge, Destruction, Explosion of Thunder
- Spells that can accomplish this task with a single-use: Sea of Lava, Giga Nuke, Sädekivi
- The transformation process destroys materials and liquids around the Sun Egg.
- The Sun Egg will slowly dissolve away and eventually vanish - best to move it to the next stage immediately.[4]
- The Sun Egg can move, and may be created with significant initial velocity due to the explosives used. (Even full-grown suns are surprisingly hard to find if you lose them...)
- Feed the Sun Egg 100 creatures to transform it again into a small version of the final form - a Star Child.
- If you are using Summon Egg, remember that it's the creatures it creates and not the eggs that count. It may take more than 100 eggs thrown to create enough creatures to complete the process.[5] - keep throwing eggs until it works.
- Add each of the 4 (5 for the dark sun) elemental stones. Each transforms the Star Child, infusing it with elemental energy and culminating with the final evolution into a Sun or Dark Sun.
- The order of the 4 basic elemental stones doesn't matter, and you can throw them in one by one, or add them all at once by jumping into the sun while holding them in your inventory.[6]
- For creating a Dark Sun, you need to make sure the Kakkakikkare is added before the last of the 4 elemental stones (otherwise you're just throwing it into the newly created Sun to be burnt up).
Notes:
- ↑ Consider doing the Moon related achievements before this quest. They require the essence status effects, rather than the elemental stones, and also require you to be at the centre of the moon, which is considerably easier when there isn't a sun there.
- ↑ Caution is advised if using Summon Sädekivi, as the beam can destroy the Sun Stone. To be safe, trigger the Sädekivi above or a short distance to the side of the Sun Stone to avoid catching it directly in the beam.
- ↑ Valid creatures include those that are homing targets, i.e. ones that Homing would home towards.
- ↑ The sun egg (the stage after bombing it but before having sacrificed 100 creatures) disintegrates over time, albeit very slowly. Feed it 100 kills to stabilize it.
- ↑ The eggs have to turn into creatures, and each creature has to die from the sun. Noita has a limit on the number of creatures that can be spawned in at once, so 100 eggs all at once likely won't work.
- ↑ Warning: Sun diving may be hazardous to health.
How to get rid of a sun
The Sun and Dark Sun are dangerous and almost indestructible objects.[1] Once you have created a Sun in place of the Moon (and/or a Dark Sun in place of the Dark Moon) future runs will see the world generated with the respective sun in place of the moon. The sun's presence makes other Moon-related activities more challenging, you will need to either move them temporarily, or remove them from future runs.
Moving a Sun
Temporarily moving a Sun away from the moon requires pushing or pulling it using gravity. Once settled into the center of the moon it is quite difficult to displace. Black Hole and White Hole will work (in sufficient quantity ~100 or more at once), but the easiest way is by using a Kuu or Kuulokivi. Other projectiles can be used to push Suns around (Burst of Air is surprisingly good for this) but will struggle to dislodge them from the moon.
If you are quick, and daring, you can create enough of a wobble in the Sun's position to be able to dash into the center of the moon and out again, but without completely freeing the Sun from the Moon's gravity. Once free, Suns tend to wander off and get lost surprisingly quickly[2], so try and keep track of where it is heading.
To stop a Sun from spawning in place of a Moon in future runs the opposite Sun type must be moved to, or created at, the respective Moon.[3] E.g. Dark Sun at the Moon, or Sun at the Dark Moon. If swapped when the run ends, in the next run (or NG+ iteration) will spawn a Moon instead.
There is no way to destroy a Sun (or a Dark Sun) individually, but there is a way to destroy both of them at once...
Supernova
Causing the Sun and Dark Sun to come into close proximity will rapidly remove both of them from existence. It also removes quite a lot of everything else from existence too (see table below).[4] This cataclysmic event is accompanied by a unique explosion sound, a cluster of white and red particles, and rather a lot of fire. The suns will remain gone until starting a new run.[5][6]
The following materials are converted into fire, largely destroying the biomes made from them.
| Materials | Commonly Found in |
|---|---|
| rock_static | Makes up the majority of the walls & ground in most Biomes |
| sand_static | |
| snowrock_static, snow_static | Icy Biomes |
| templebrick_static, templebrick_noedge_static | Holy Mountains |
| steel_static | Hiisi Base |
| lavarock_static | Hell Biome |
| sand_static_rainforest | Rainforest Biome |
| cloud | Sky biome |
| rock_static_grey | Coal Pits & Power Plant Biomes |
| wood_static, wood_static_vertical | Many biomes and structures |
Notes:
- ↑ The Sun will persist if it was created at the Moon and the Dark Sun will persist if it was created at the Dark Moon otherwise it will disappear upon starting a new game/NG+ iteration.
- ↑ The Suns keep the area of the game world around them loaded, so they can continue to move even when you aren't nearby. Without a trail of destruction to follow (especially likely in the Sky where there's not much for it to crash into) they quickly become practically impossible to locate.
- ↑ A sun may be reverted to a moon by creating or moving the opposite sun to that moon.
- ↑ This transformation effect persists through NG+.
- ↑ You may supernova the two suns and they will still persist in their respective locations (sun in moon and dark sun in dark moon) in consecutive runs. It is the moon that remembers what is the last type of sun that consumed the moon, if the sun was the correct type, then the moon will spawn it there.
- ↑ The Moon(s) also die(s) from a single event, like one of these sun collisions, so no matter what you do in the location after, you cannot mess moon's "memory" up.
Associated achievements and cosmetics
The following are required for the related Achievement Pillars and the crown cosmetic[1]:
Uusi Aurinko
Create the Sun
Pimeä Aurinko
Create the Dark Sun
also unlock the Crown cosmetic.
As Above, So Below
Create a sun at both moons, with the second moon created being a normal Sun[2]
As Above, So Below (Dark)
Create a sun at both moons, with the second moon created being a Dark Sun[2]
Supernova
Cause a Dark Sun and a Sun to collide (they can be more easily moved with either a Kuu or Kuulokivi)
Benign Sunshine!
Kill Kolmisilmä with a sun (It is advised to collect a few orbs so the boss has enough health to survive the trip)
Notes:
- ↑ Note: The minimum requirements to receive the Crown cosmetic is to create the Sun at the Moon, and the Dark Sun at the Dark Moon. After the suns are created, the Crown will appear on subsequent runs. If you move a sun away from its moon, nothing happens to your crown. No in-game action removes it after you have it.
- ↑ 2.0 2.1 Note that these suns must be created from the sun seed, and using those made by sacrificing the gems from the Celestial Scale will not count towards the achievement pillar. It is unknown if this is intended behavior.
Guide to getting all the Sun pillar achievements in one run
TLDR:
- First run: Make a New Sun at Both Moons
- NG+: Make a Dark Sun at Dark Moon (This completes the Sun Quest, and leaves both suns at their respective moons)
- Colliding the suns and killing the boss with it can be done at any stage of this quest
In Detail Explanation:
- Break the reroll machines to get perks
- Perk Lottery x 4
- Extra Perk x 3
- Gas Blood - Prevents staining from the Sun damaging you. Alternately, Fungal Reality Shift your blood (whether regular, Slime, or Oil) into a material that doesn't stain (e.g. Worm Blood). Whichever you do, don't pick up a different blood perk afterward, as this will override your current blood.
- Stainless Armor x 15
- Repelling Cape x 2 (note that taking more stacks may cause undesirable staining behavior)
- Saving Grace
- Kill the ghost miniboss for a Sun Seed
- Place the Sun Seed on the top of the pyramid to create the Sun Stone
- Take the Sun Stone to the center of the moon.
- Summon bombs (Divide by 10 + Bomb) on it to evolve it into a Sun Egg
- Summon eggs (Divide by 10 + Summon Egg) at the Sun Egg to make a Star Child. Sun needs to get 100 kills total.
- Collect 4 essences and use the essence eater to get the elemental stones
- Alternatively, the fire stone and thunder stone are naturally generated around the world. Pedestals frequently spawn in the fungal caverns
- Throw the elemental stones into the star child to make a new sun, or go inside it and it will grab them from your inventory.
- Repeat the above steps to make another sun at the Dark Moon
- Start the fight with Kolmisilmä and kill it with a sun. The boss follows you no matter how far you travel and through all terrain, but can get distracted by other enemies.
- Take the portal that spawns on its corpse to get the Benign Sunshine achievement then exit the room
- Get another Sun Seed from a parallel world. You can get two to make supernova easier in NG+.
- Go to NG+
- Make a Dark Sun at the Dark Moon
- Use a Kuu or Stone of Hearing to drag the New Sun and Dark Sun together to cause a supernova. You can make a New Sun in hell so you don't have to drag suns through the whole world.
You'll want to make frequent backups throughout this process. Sun Seeds are not obtainable in NG+. Furthermore, items sporadically disappear off screen when they clip into the ground and when Noita crashes.
Explanation of why only a Dark Sun has to be created if you opt to NG+
When the first sun is created at a moon in a run, this information is recorded and remains recorded throughout the entire run even in NG+ iterations. Therefore, you can create a sun at the other moon then enter NG+ and create only a Dark Sun at the Dark Moon rather than having to make an extra sun and then a Dark Sun. If instead you started a new run, this information is lost. You would have to make two suns.
Limitations
- There is no Ghost miniboss in NG+, so Auringonsiemen must be carried into NG+ by you.
- Entering NG+ can delete some of your sunseeds or sunstones due to a bug, but 2 sunseeds and 2 sunstones seems to be a combo that survives the trip often. Fix for this issue in the note below.
- There is only one Essence of Fire, so additional Kiuaskivi must be found.
- Essence Eaters are limited - There are six (two in the main world, two each in the first parallel worlds in each direction) in NG and only two (in the main world) in NG+.
- A moon can only "react" to one Sun per NG cycle. Further actions in that NG+ iteration will not have an effect; enter another iteration if required.
Important note: Entering NG+ can delete extra sun seeds and sun stones due to a bug. There is a mod on steam workshop that fixes this.
Prior Questline & Clues
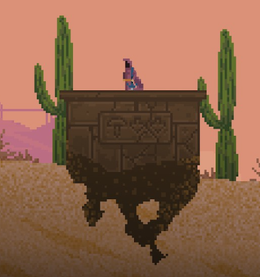
Around the leftmost side of the Desert, there is a brickwork structure with a mushroom and two arrows pointing down engraved into it.
By traveling straight down from it, through the Desert Chasm, you will eventually run into a peculiar sight. A huge, stone mushroom with a narrow tunnel on the bottom part.
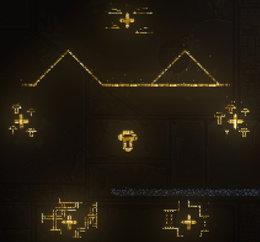
Walking to the end of the tunnel while carrying a ![]() Tripping status effect for at least 180 seconds will cause the inside of the structure to turn into Rainbow Liquid, which will reveal a map within, highlighting the locations of the fungal altars:
Tripping status effect for at least 180 seconds will cause the inside of the structure to turn into Rainbow Liquid, which will reveal a map within, highlighting the locations of the fungal altars:
- The western edge of the Coal Pits' Fungal Caverns.
- Directly above the Brickwork structure with fungus glyphs on the western edge of the Desert.
- The middle of the left side of the Power Plant.
- Around the middle of the bottom part of The Vault.
- The top-right corner of the Overgrown Cavern.
Holding a Paha Silmä inside one causes a rainbow mushroom with three eyes to appear. If you then start tripping, a special book will appear, containing a hint for completing one of the phases. Approaching the altars with Tripping for at least 180 seconds will reveal its respective notebook, each one detailing on a step of the process of its creation.
Notes on Grand Alchemy (Coal Pits)
Among the great alchemical endeavors there are some that,
while not equal to the Great Work, nonetheless are revered greatly
for the deific potence they instill to whomsoever succeeds
in harnessing their power.
The One I am about to discuss calls for a Seed of great promise, hidden deep within the Soil of this Earth...
Notes on Grand Alchemy (Desert)
...Bring the slumbering Seed to life by letting it soak in the rays of the Sun, on the pinnacle of past civilizations...
Notes on Grand Alchemy (Power Plant)
The alchemical process requires great Fire and Heat; for this purpose,
lay the Stone in Fiery Earth and bring forth its transformation with great magical Heat of Destruction...
Notes on Grand Alchemy (The Vault)
...Once finished, it will sustain life; to this end, its Creation asks for a substantial amount
of Life Force. Let the Egg engulf One Hundred of your Foes and drink their Blood...

