和平结局攻略
One of the possible endings in Noita is the peaceful ending, where you have collected the Sampo and 33 orbs and turn them in at the sky altar on The Floating Island above the mountain. Collecting 33 orbs is only possible in New Game Plus (NG+) due to the Lava Lake orb not appearing in parallel worlds in New Game. The final boss Kolmisilmä gets a significant amount of health from 33 orbs, along with new attacks and defences. To get the ending, fighting the boss is not mandatory, but this guide will explain ways to deal with him. You could kill the boss before collecting the orbs, or collect the orbs and get to the sky altar with the boss still chasing you. The reward for doing a peaceful ending is a pillar piece above the tree in-game and a permanent golden amulet for the player character.
Getting started
A summary of things you want to do:
- Go down the main path, looking for the tools to travel and dig efficiently, and tools for surviving cursed rock.
- Get back to the surface and fight the High Alchemist miniboss for his spells.
- Go to parallel worlds and hell for more perks and spells.
- Take 5-10 orbs to the sky altar along with Sampo to enter NG+
- Get the orbs (or kill the boss first)
- Kill the 33 orb boss (or just take the Sampo)
- End the run with 33 orbs at the sky altar
There are a few perks to avoid in this run:
- Homing Shots can mess with acceleration and is a DPS loss
- Concentrated Spells and Boomerang Spells make healing spells hurt you. This can make healing harder or kill you. Also boomerang spells will significantly hinder acceleration.
Also, No More Shuffle has more value, since you want to find those high max-mana shuffle wands and make them no-shuffle. Unlimited Spells is also nice to have, to make Divide By 10 infinite, but you can work around that with Wand Refresh.
How to survive
Perks you should prioritize getting:
- Repulsion Field
- Permanent Shield
- All the immunity perks
- More Love
- Saving Grace
- Extra Life
You'll want all the defensive perks you can get. Four More Love perks will make all enemies friendly, though they will attack when damaged. More Love perks protect you even while polymorphed, so it's great to have in a run where you'll be exploring a lot through fungal or magic temple, where polymorphing is likely.
Healing spells are also important to survival; if you have a lot of health, then Circle of Vigour's max hp based healing is powerful. If you chose to take Glass Cannon perks and your hp is low, the Healing Bolt projectile might be a better choice. Glass Cannon boosts the healing from Healing Bolt, and berserkium does the same. Spells that the High Alchemist miniboss drops can make your healing spells infinite, Alpha and Gamma spells specifically are very useful. Wand Refresh at the end of the cast will also ignore any charges that would be consumed otherwise.
When fighting the 33 orb boss, a single Repulsion Field keeps you safe from most of his attacks. The biggest danger in the boss fight is him catching your piercing projectiles and firing them back at you. Saving Grace will protect you from those and gives you a chance to heal back up.
How to get to parallel worlds
Parallel worlds have a whole new world to explore, identical to the main world. You can get more perks and spells and even fight the High Alchemist miniboss again. This is a great way to become more powerful and to be strong enough for NG+ and the 33 orb boss. The most efficient way to power up is to break the reroll machine.
Right from the beginning you should start looking for a couple things that will help you reach parallel worlds:
There are many ways to go through the cursed rock to enter a parallel world. The easiest and safest way is to stain yourself with ambrosia, using speedy Black Holes to dig and moving with teleport spell. Teleporting will not reduce the ambrosia stain, which would otherwise quickly wash off with movement. You can survive without ambrosia, if your teleport and digging wand are good and you have more than 400 health. The cursed rock usually deals about 200 damage if you are fast.
Alternatively, you can cast black holes at a slight angle downwards, pour some ambrosia in the tunnel, and let gravity keep you stained. With a little caution, even slow black holes can used effectively to cross the cursed rock. Going the other direction, though, will require you to repeat the process at a different height on the rock wall or to use some other method of egress.
Where to find spells
| High Alchemist miniboss | Alpha, Gamma, Tau, Wand Refresh, Mu (All greek letters and Wand Refresh) |
|---|---|
| The Work (Hell) | Summon Taikasauva, Divide 10, Alpha, Gamma, Tau, Gold to Power, Blood to Power, Wand Refresh, Mu, Spell duplication |
| Summon Taikasauva | Accelerating shot, Add Mana, Anti-Gravity, Black Hole, Boomerang, Chainsaw, Gravity,
Heavy Shot, Light Shot, Mana To Damage, Piercing Shot, Poison Trail, Rotate Towards Foes, Small Teleport Bolt, Spells To Power, Teleport Bolt. |
| Any biome | Critical on Wet/Bloody/Oiled (Doesn't show up on tier 3 wands, so never on Hiisi base wands or from Summon Taikasauva) |
| Material spells (Water, Blood, Oil) from spellshops or chests | |
| Circle of Shielding (Mines wands, spellshops or chests) |
Lets go over some of the less obvious spells and why they are on the list:
- Accelerating shot will slow down the starting speed of a projectile and then increase it over time. Several projectiles scale with acceleration and this is one of the strongest damage multipliers in the game. Works with Bouncing Burst, Arrow, Energy Sphere, Infestation and Disc Projectile. Bouncing Burst is advised. The damage multiplier will be bigger if the starting speed is as low as it can be, without being too low to make the spell fizzle. Minimum starting speed is 5 and the maximum speed is 1000.
- Gravity and Anti-Gravity helps accelerating wand builds by bringing the starting speed up to the minimum speed needed. However, you don't want to divide this modifier, so it pairs poorly with Mu.
- A material spell cast together with another projectile will make the target to be considered stained with that material, even if the material doesn't hit the target. This enables Critical on X spells to increase your damage. Critical on X spells stack past 100% and turn into bigger critical damage multipliers.
- Circle of Shielding is a great long lasting spell that you can stack damage on for Spells to Power to consume. You could use Dormant Crystals, but those can be destroyed prematurely.
- Mana To Damage turns about 62% of the max mana on the wand into damage and sets the mana on the wand to 50. If you don't cast it directly, but through Mu only, you can avoid the mana drain. The maximum mana on a wand is 20000, so the most damage it can add is around 12400 per cast.
- Gold To Power takes a maximum of 24000 gold per cast and adds 10909 damage. You can avoid the gold drain by having over 2.1 billion gold, where your gold amount turns into an infinity sign.
- Blood to Power takes your hp and turns it into damage. At 54545 hp it hits the maximum amount of 24000 damage. You will need ambrosia or stainless armors to block the damage and make this more usable.
- Mu will copy all the projectile modifiers on the wand. This will divide all the damage increasing modifiers and is a massive damage boost, but it also copies accelerating shot and speed ups, which will make hitting the correct starting speed harder. Mu will also cast copies of Mana to Damage without them consuming all of the mana on the wand. It's adviced to only cast Mana to Damage through Mu for this reason.
- Add trigger can be used like Mu to divide projectile modifiers, but is way more controllable and efficient way to do it. Add Timer and Add Expiration Trigger work just as well for this. Add trigger looks ahead on the wand for a spell it can turn into a trigger and casts all the modifiers before that for free. If it hits a spell it doesn't want to turn into a trigger, it aborts, but the modifiers stay in the cast state. Spells that can abort Add Trigger include Blood Magic, Gold to Power, Blood to Power, Wand refresh, 0 charge spells and even just end of the wand works. Example wand using Add Trigger in the boss kill section below.
How to find the orbs
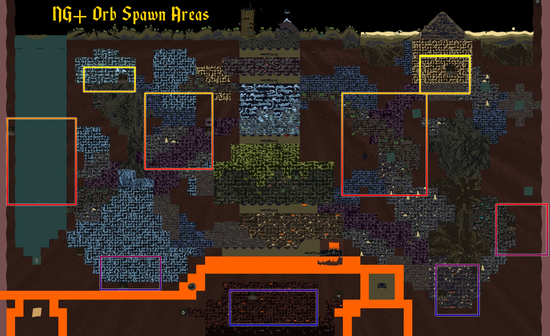
In NG+, your world has randomness depending on NG+ number and seed. Biomes that are not on the main path can be different than what another NG+ world has. Some things are set in stone, and with experience you'll become familiar with these. Orb spawn locations have randomness too, but the randomness is limited. On the map linked here, you'll see the different areas that orbs have to spawn inside. The two surface orbs remain stationary, but all the 9 other orbs move around inside their possible spawn areas.
Searching these areas for the orb could still take a long time, especially if you don't search systematically. Good places to re-orient yourself are the surface, the holy mountains, the final boss room and the water biomes. On the map, you'll see that digging straight right from the boss room intersects with the top of the Wizards' Den orb area, and the bottom of the Lava Lake orb area, the east most orb on the map. Using the places listed you can mark one end of the search area and be more efficient in your search.
Once you've found all 11 orbs in the main world, finding them in parallel worlds is relatively easy, as they will be in the same location as in the main world. You don't need to pick the orbs in the first parallels. Going into East East (or West West) or further, could be helpful, if you lack the All-Seeing Eye perk. The areas you need to search could have magical darkness, but that darkness goes away around the second parallel world.
Keep in mind that one of the orbs is in the lake. Perks like Faster Swimming and Breathless can help getting it. Freeze field perk will most likely slow you down in the lake. Also keep in mind that parallel world orbs have cursed hearts inside that poison you for 2000 frames. Having glass cannon (and over 50hp) will block the heart and the damage. If you choose to not get glass cannon, use ambrosia to stay safe. If you take the orb skillfully from the very edge of it, you can get the orb without taking the heart.
How to kill the boss
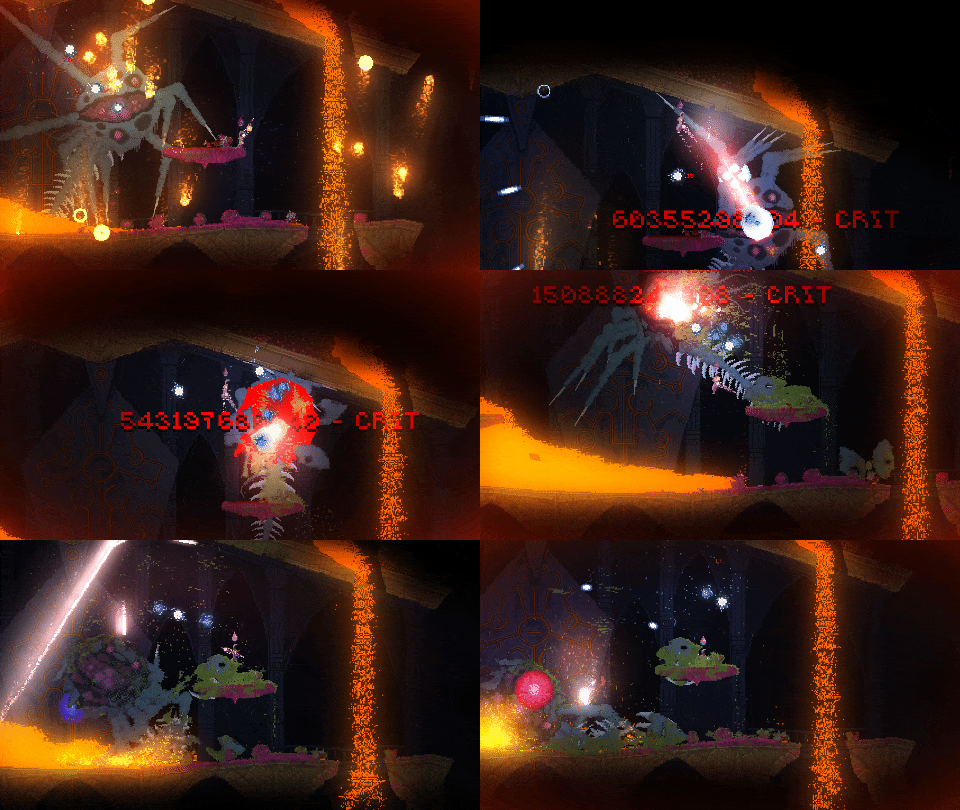
The easiest 33 orb boss you can face is in NG+1 world. His health is equal to a 34 orb boss, each NG+ gives him a buff equal to one orb. His health is a bit over a trillion: 1,057,545,012,718. With poison trail on something that pierces, you can get his hp quickly down to 5%, which is about 50 billion. The rest of the way you need to deal damage. A piercing, accelerating bouncing burst is a classic high damage combo that works well for this, so I'll advice on how to build a wand like that. If you do your own build instead, the damage you want to do in a single hit is at least 300 million on a normal enemy. When you add piercing to that the boss dps should be a billion or more and that's enough to kill the boss in a reasonable time.
Here's an example of a relatively easy to build wand that deals 4 trillion dps on the boss, if you have 55000 hp or more. Have ambrosia stain on you or enough stainless armors to manage the damage that blood to power deals to you.
The wand below is using Add Trigger to divide the modifiers after it 800 times. Having gravity and piercing before the setup makes sure those are cast only once. Divide by 800 on all the modifiers is so strong that this wand doesn't even need big damage modifiers like Blood to Power to oneshot the 33 orb boss, one heavy shot is more than enough. The example wand deals about 2 trillion dps. Having enough multicast is needed, The add trigger setup needs to be drawn together with the bouncing burst. The first spell that Add Trigger finds after the projectile modifiers is very important. In the example it finds wand refresh, but it could also hit the end of the wand, or a 0 charge spell, Blood to Power, Gold to Power or Blood Magic.
The easiest way to bring this damage up is to use a two wand setup with spells to power. The secondary wand creates high damage shields that stay on you or are stationary, the primary wand absorbs damage from the shields with spells to power. The wands below deal quadrillions of dps, if you have infinite gold.
There is also a wand setup exploiting an interaction between Tentacles and Spells to Power that can reach damage numbers too high for the game to display. Homing spark bolt is a safe version, but with explosion immunity those two spells can be replaced with just Summon Missiles as the last spell. This wand can kill the final boss no matter how many orbs it has. You do need to have some distance from the boss when casting the wand and make sure his shields are down.


